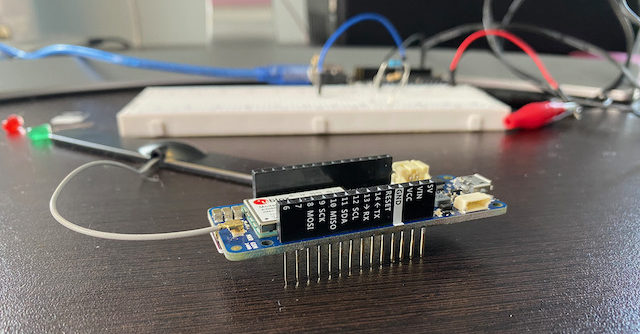
If you are like me, you probably picked up the MKR GSM 1400 in order to work on an IoT prototype that requires internet connectivity. The MKR GSM 1400 is a great concept, as it takes the small form factor and 32 bit capability of an Arduino Zero and adds a 3G/GSM radio.
On top of that, it has a crypto chip which will be needed for pretty much any Cloud IoT service connectivity, an antenna, and a battery hookup for a signal-boost.
It has been a few years since I used Arduino, and even then it was for some pretty basic experimentation. One thing I didn’t come across very easily was a lot of info on how to get it up and running quickly. So, here it goes.
If you haven’t yet picked up the board, you can get one on arduino.cc or Amazon for about $70. Make sure you get the one with the antenna if you don’t already have antenna with a micro UFL connector.
Prereq. Install Arduino IDE
Use the Getting Started guide for help setting up the Arduino Desktop IDE on your computer.
Step 0. Set up the Board and SIM Card
For most of us who have some experience using other Arduino boards, but are new to the MKR GSM 1400, or any board with a cell radio, this step is where we run into most of the issue, and also where I have found info to be lacking. I’ll break it down to 3 pieces: The antenna, the SIM card, and the battery.
The Antenna
As I mentioned earlier, you are going to need an antenna. Even if you are in good cell coverage, it won’t work well enough to be of use (if at all) without the antenna.
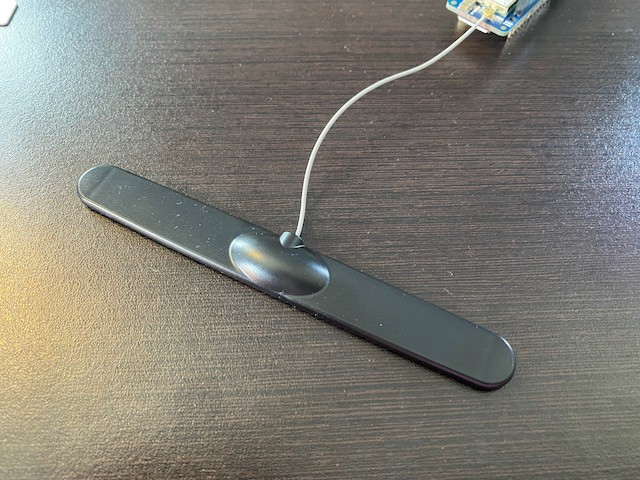
If you purchased the board with the Dipole Antenna included, go ahead and connect it. You can also pick up the antenna from arduino.cc for about 5 bucks. Any other antenna with a micro UFL connector should work.
The SIM Card
Your SIM will need to be activated and inserted in slot on the bottom of the board. Everyone’s SIM card activation experience will differ depending on who they bought it from. Check with your provider for instructions.
A Note on SIM cards and SMS: Many SIM cards designed for IoT will have additional configurations required or capabilities for sending and receiving SMS text messages. Some require a phone number to be added to the SIM for a separate feed. Others like Soracom, which I used for my test, allow me to receive SMS on the SIM if I send it from their web console, but in order to send SMS from the SIM, I have to use some other API provided by Soracom. Important to keep in mind if your project involves SMS.
Power and Battery Requirements for MRK GSM 1400
The board has a battery port allowing it to run on a 3.7v LiPo battery of at least 2500 mAh. I used this one from Adafruit. In additional to powering the board (if not connected via USB or Vin), the battery also impacts how well the radio works. Per the Arduino MKR GSM 1400 docs:
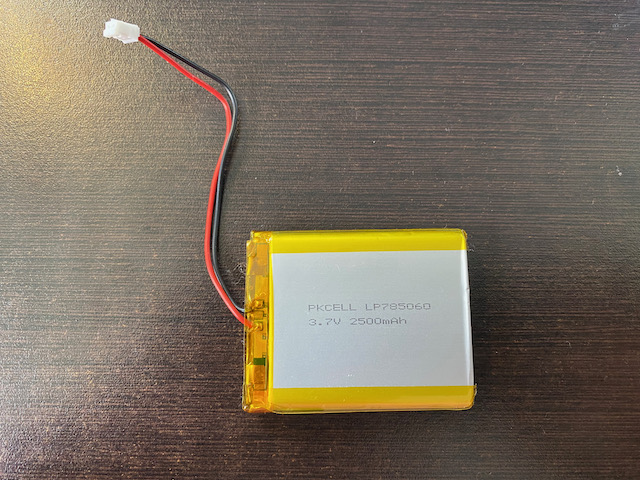
Communication over cellular networks, requires current peaks above the maximum a USB port can provide. While the port reaches 500mA, a typical GSM handshake (when the board boots and registers on a network provider) could easily reach a 2A peak. Therefore it is recommended to either provide a source with a higher current limit over Vin, or having a LiPo battery of, at least, 2500 mAh.
So, if you are powering your board via USB, then you will have better radio reception if you also have a battery attached or are powering the board through Vin.
Step 1. Install the Board Support in the IDE
In the Arduino IDE, go to Tools > Board > Board Manager. Search for ‘MKR 1400’ and install the latest version for Arduino SAMD Boards. SAMD refers to the version of microchip used by Arduino’s MKR and Zero boards.
Once installed, select this board by going to Tools > Board > Arduino SAMD > MKR GSM 1400
Step 2. Install the MKR GSM Library
In the IDE, go to Tools > LIbraries. Search for MKRGSM and install the latest version.
Step 3. Run Tests
With the MKR 1400 board selected and the MKR GSM library installed, we are now able to run some test sketches agains our MKR 1400 to configure our radio and verify the cell connectivity. All the tests below are available via MKRGSM library, so we don’t even have to do any coding outside of adding our SIM’s GPRS settings in a couple of places.
Note: If MKRGSM menu option is under File > Examples > INCOMPATIBLE, then you need to select the correct board by going to: Tools > Board > Arduino SAMD > MKR GSM 1400. If you don’t see MKRGSM at all, go back to Step 2.
Most of the following tests were from Tom Igoe’s excellent 1400 Pre-flight Checklist. Tom is a an Arduino cofounder, and had a hand in writing several of the example sketches we are using.
How to Run the Tests
- Each test can be accessed via the Menu under File > Examples > MKRGSM > TestName
- To see the output of the test, open the Serial Monitor under Tools > Serial Monitor
3a. TestModem
This is to verify our modem is working and the SIM card is installed correctly. The sketch will take a few seconds to run, and when completed you will see:
Starting modem test…modem.begin() succeeded
Checking IMEI…Modem's IMEI: NNNNNNNNNNNNN
Resetting modem…Modem is functoning properly
If you don’t get this message, check that your SIM card is mounted properly, and run it again.
3b. BandManagement
I don’t know what default ships with the MKR GSM 1400, but it appears to set to E-GSM whenever this sketch runs.
Restarting modem…
 Modem restarted.
 Current band:EGSM_DCS_MODE
 Want to change the band you’re on?
 Select band:
 1 : E-GSM(900)
 2 : DCS(1800)
 3 : PCS(1900)
 4 : E-GSM(900)+DCS(1800) ex: Europe
 5 : GSM(850)+PCS(1900) Ex: USA, South Am.
 6 : GSM800(800)+GSM(850)+E-GSM(900)+PCS(1900)
 7 : UMTS(2100)
 8 : GSM(850)+E-GSM(900)+PCS(1900)+UMTS(2100)
For US, I selected 5:
Configuring band GSM850_PCS_MODE
 Success
3c. GSMScanNetworks
If your SIM requires a PIN, enter it in the arduino_secrets.h file. This test may take a few seconds to several minutes to run. This is the first test where you actually connect to a network, so you will need to attach an antenna.
GSM networks scanner
Modem IMEI: 0041005400260054
Scanning available networks. May take some seconds.
Current carrier: 0041005400260054
Signal Strength: 26 [0-31]
Scanning available networks. May take some seconds.
   AT&T
   T-Mobile
Current carrier: 0041005400260054
Signal Strength: 26 [0-31]
Scanning available networks. May take some seconds.
   AT&T
   T-Mobile
Current carrier: 0041005400260054
Signal Strength: 26 [0-31]
Scanning available networks. May take some seconds.
The Effect of Battery on MKR GSM 1400 Signal Strength
This is the first test where I noticed a higher signal strength when I had a battery connected than without. At least, I did for AT&T, which is apparently what Soracom runs on. (0041005400260054 is hex for AT&T).
Testing with Soracom/AT&T, signal strength was 26 without battery, and 28-29 with battery connected.
When testing on a T-Mobile SIM and carrier, the battery didn’t appear to have any effect. Signal strength on T-Mobile ranged from 8-12 with or without the battery attached.
3d. SendSMS
For sending an SMS from here in the US, I was able to just just area code and the number, no country code or + necessary. Also, your data carrier may require you to do additional configuration on their end, such as setting up a phone number for the sim. Or, they may not allow sending SMS to non-customer accounts, as was the case with Soracom.
While I couldn’t send an SMS with a Soracom SIM to a non Soracom device, a T-Mobile SIM had no such issue.
SMS Messages Sender
 GSM initialized
 Enter a mobile number: 5551234567
 Now, enter SMS content: SENDING
 Message:
 test1
 COMPLETE!
4d. ReceiveSMS
As with SendSMS, this one also depends on your SIM provider. I had no issue using another device to the MKR with a T-Mobile SIM installed. With the Soracom SIM, I had to log in to the Soracom management console and send the through their service.
SMS Messages Receiver
 GSM initialized
 Waiting for messages
 Message received from:
 +15551234567
 Test 2
 END OF MESSAGE
 MESSAGE DELETED
3e. GsmSSLWebClient
As Tom Igoe mentions in his preflight checklist, GsmSSLWebClient is where we actually test the data connectivity, or GPRS.
Before running this Sketch, we need to do 2 things.
- in arduino_secrets.h, enter your provider’s APN and any login/password info.
I used the following for Soracom:
APN: soracom.io
Login: sora
Passord: sora
And for T-Mobile:
APN: epc.t-mobile.com
Login: guest
Password: guest - If you receive a HTTP/1.1 301 Moved Permanently error when running this test, find the line:
client.println(server)and replace it withclient.println("www.arduino.cc"). More info on the the issue can be found here.
Starting Arduino web client.
 connecting…
 connected
 HTTP/1.1 200 OK
 Server: nginx
 Date: Wed, 23 Jun 2021 17:43:29 GMT
 Content-Type: text/plain
 Content-Length: 2263
 Last-Modified: Wed, 02 Oct 2013 13:46:47 GMT
 Connection: close
 Vary: Accept-Encoding
 ETag: "524c23c7-8d7"
 Strict-Transport-Security: max-age=500; includeSubDomains
 X-Content-Type-Options: nosniff
 X-XSS-Protection: 1; mode=block
 Accept-Ranges: bytes

[ASCII Art of Arduino LOGO]
You must be logged in to post a comment.