A fun project I’ve been working on recently is an Appcelerator module called titanium-mapbox that wraps the Mapbox iOS SDK for use in Titanium projects. I will be giving a talk about all the things you can do with Mapbox, Titanium and OpenStreetMap data at tiConf New York in May, so get your tickets!
Loading a Map hosted on Mapbox.com in Titanium
Among features like offline map access and adding custom data, Mapbox makes it incredibly easy to create a map and style it with your own colors using their online editor, and then add it to your Titanium project with the titanium-mapbox module.
This past weekend, an app called Cloak blew up on the news for allowing you to avoid people in your network by tracking where they post to location enabled services such as Foursquare and Instagram.
I’m not so much interested in avoiding my friends, but when I saw a screenshot of the app and its slick looking green and black map of New York, I thought “Hmm, I bet they used Mapbox for that!” And then I thought, “Hey! That would make a great example for the titanium-mapbox module.”
Part 1. Creating our Map
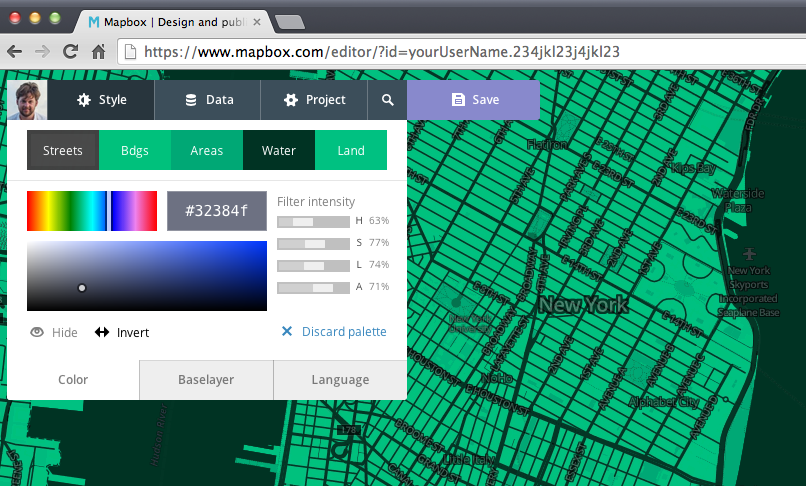
Most of the work is done on the Mapbox.com map editor, and it should take you about 5 minutes total.
1) Log in or create a free account on Mapbox.com
2) Under Projects, click Create Project. This will show you a default map and a toolbar in the upper left corner.
3) On the toolbar, click Style. Here you can set the colors for the 5 different components that make up the map: Streets, Buildings, Areas, Water and Land. Though slightly out of date, you can find more info on customizing the map colors here.
Using a screenshot of the app and my favorite Color Picker tool, I just set the hex values for each of the map components, and set most of the intensity levels to 100%. You can fiddle around with the values some if you like. I came up with:
- Streets: #32384f — with the intensity levels around 70% (The rest are assumed 100%)
- Buildings: #00c17c
- Areas: #00a875
- Water: #003323
- Land: #00c181
4) Save your project and give it a name if you like.
5) Under Settings, you should see an ID field. It should be a combination of your user account and a number/letter combination. We’ll use this ID to load up the map in your Titanium project.
And that’s it! Next step is loading up the titanium-mapbox module and pointing it to our custom map.
Part 2. Adding the Map to our Titanium App
I’ll assume you already have a Titanium project created, and know how to add modules to it. You can get more info on this below:
Also, note that Mapbox iOS SDK and the titanium-mapbox will only work on Titanium iOS projects. I know the Mapbox guys are working on an Android SDK, but it may still be a ways out.
1) Get the titanium-mapbox zip file an add it to your project. If you need help adding it to your project, refer to Appcelerator’s guide for Using Modules.
2) In your code, add the following. The map property will need to be set to your Map’s id, discussed up in Part 1 – #5.
var mapbox = require('com.polancomedia.mapbox');

var mapView = mapbox.createView({
    map: 'yourUserName.234kj234jk', //set this to your map ID
    minZoom: 1, //8,
    zoom: 14,
    centerLatLng:[40.713715, -73.966652],
    userLocation: true
});

myWindow.add(mapView);
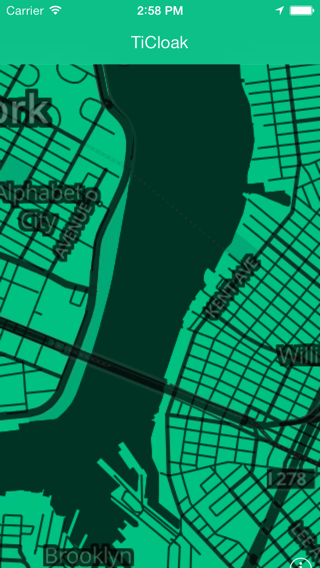
Sample Project
I have created example project called TiCloak that shows how to use titanium-mapbox in Alloy. You will still need to go through Step 1 to create your map, but then you can just add your map id and build.
Still more to come with titanium-mapbox. I’ll try to get another post out talking about some of the other bits of functionality in the next month. Otherwise, hope to see you at tiConf!
You must be logged in to post a comment.